


.png)
.png) Français
Français .png) Deutsch
Deutsch .png) Italiano
Italiano .png) 日本語
日本語 .png) Português
Português  Español
 LARK MAX 2 Support


-
Use a USB-C to USB-C cable to connect RX to your phone
-
Download LarkSound APP from APP Store to set the parameter
Note: For iPhone 14 and previous model, need use the Lightning to USB-C cable

-
Use a standard USB cable to connect the RX to the laptop.
-
Find the mic input of Wireless Microphone in the computer Sound Setting or Recording Software.

|
TX Internal Recording (Metadata Timecode) |
RX 3.5mm/UAC output Audio Timecode (Mode 1) |
 |
 |

Once the OWS Monitor Earphone is in Bluetooth Mode and paired with your phone, open the HollyAudio App. The Connect screen for the OWS Monitor Earphone will appear on the app’s home page—tap Connect to begin the firmware update.
-
Double-tap: Answer/end calls, play/pause music
-
Press and hold for 3s: Reject incoming calls
-
Triple-tap the left earphone: Previous track
-
Triple-tap the right earphone: Next track

-
Mode 1 is recommended for optimal performance.
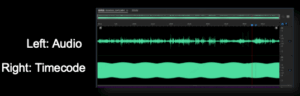
In this mode, both the 3.5mm jack and USB-C port are configured identically: the left channel carries a mix of all TX audio, while the right channel carries timecode signals. It is advised to connect the RX’s 3.5mm TRS output jack to the camera’s microphone input to feed timecode into the camera. When using wired monitoring, you will hear the mixed audio in the left channel and the timecode signal in the right channel. If you are using wireless monitoring, the timecode will not be audible in either OWS monitor earphone.
Important Note for Mode 1: The 3.5mm TRS headphone jack will not output either the mixed audio or the timecode signal if the “Wired Monitoring” option is not selected.

-
Mode 2
In this mode, the 3.5mm TRS output jack outputs a mix of all TX audio, while the USB-C port outputs the mixed audio on the left channel and timecode on the right. This mode is suitable for scenarios where the RX needs to send timecode to a device via USB, while the 3.5mm output can be used for audio recording.

-
Mode 3
In this mode, the 3.5mm jack output all TX audio (in stereo or mono ), while the USB-C port outputs timecode audio. This mode is designed for use when the TX is recording internally or when the RX is connected to another recording device. Please note that Mode 3 becomes unavailable if you have wireless monitoring enabled and have the camera connected via the hot shoe.
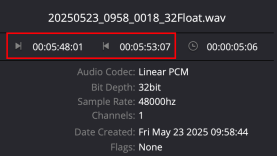
1. In DaVinci Resolve, we’ll first import our camera footage and the TX’s internal recording.
2. Next, we’ll update the video’s timecode from its audio track. You’ll see the timecode values adjust.

3. When we insert both clips into the timeline using their embedded timecode, the camera’s audio (on channel 1) automatically aligns perfectly with the TX’s internal recording (Audio 2, labeled 6701), despite the TX having started recording later than the camera.

You can learn how to use the timecode feature by watching this video: https://www.youtube.com/watch?v=-nM_-mjanrQ
Note: This function is only compatible with lavalier microphones that follow the TRS standard, where the Tip and Ring are used for the microphone signal and the Sleeve serves as the ground.
We recommend manually lowering the audio input gain on your camera to an appropriate level.
-
Power off your TX device completely.
-
Power it back on and let it reconnect to the Camera RX.
-
The internal recording will now use the updated bit depth.
-
In quiet indoor environments, it is not recommended to enable Noise Cancellation, or you may set its depth to 10 or lower.
-
When recording musical instruments, it is also not recommended to use Noise Cancellation, as the feature may inadvertently treat parts of the instrument’s sound as noise and suppress them.
-
How to Adjust: On the camera receiver, press the menu knob and navigate to Mic Settings > Noise Cancellation. On the phone receiver, adjust the setting within the HollyAudio App.
-
Remove the protective film: When first using the microphone, ensure the insulating film on the bottom contacts has been removed.
-
Check the charging case battery: Make sure the charging case itself has sufficient battery before use.
-
Inspect the contacts: Check if the charging contacts on both the case and the microphone (TX/RX) are clean, free from dirt, dust, or blockage.
-
Clean the contacts gently: If needed, use a soft cloth or alcohol wipe to gently clean the metal contacts on the microphone and case to ensure good connection.
-
Ensure proper placement: When charging, place the microphone firmly and correctly into its slot in the case.
If the issue persists after completing all the steps above, please contact our after-sales service for further assistance. https://account.hollyland.com/index.html?lang=en&redirect=https://my.hollyland.com/main/account_overview